¶ Windows Licensing Monitoring Service (WLMS)
I noticed an issue where my machine would shut down every hour. By reviewing event viewer, I found that the shutdown was triggered by WLMS because my evaluation license had expired. In order to disable this service and prevent my machine from reaching out to Microsoft servers to verify licensing, I needed to utilize PsExec from Sysinternals. Here are the steps I took:
- Open elevated command prompt and run
PsExec -i -s cmd.exe- This elevates the command prompt to the NT Authority/SYSTEM account. (Use command ‘whoami’ to confirm.
- Note: I put the psexec.exe file in the System32 folder so that I could execute this command directly without requiring the path. This also ensures it can only be used as admin.
- Execute command
services.msc. This will open Services using the system account. - Now WLMS can be disabled with
net stop wlms - Restart computer
¶ Registry
These are edits I made to the registry.
¶ HKCU\Control Panel\Desktop
- MenuShowDelay = 100 (milliseconds)
- This affects the speed at which menus pop up when you hover over them. Default is 400 which is pretty slow. Don’t set this too low, like 0, because this can cause issues.
- DragFromMaximize = 0
- Default is 1. By setting to zero, you cannot drag a window when it is maximized.
¶ HKLM\SOFTWARE\Microsoft\Windows\CurrentVersion\Policies\System
- VerboseStatus = 1
- Add DWord. This will give verbose information while computer is shutting down and starting up.
¶ Disable “Search the Web” in search suggestions
This one is a bit more involved. I started out with HKCU\Software\Policies\Microsoft\Windows\Explorer. The ‘Explorer’ folder needed to be created, then a DWord called “DisableSearchBoxSuggestions” set to 1. After restarting, nothing changed.
Next, I tried HKCU\Software\Microsoft\Windows\CurrentVersion\Search and added the DWord “BingSearchEnabled” and set it to 0. This also failed.
Next, I attempted to make a change in the local group policy. Open mmc.exe as administrator and add the local group policy snap-in. Navigate to Computer Configuration\Administrative Templates\Windows Components\Search and enable “Don’t Search the web or display web results in search”. This also failed, so next I tried GPO (see below).
¶ Group Policy
¶ Remote GP Results
I was trying to use my windows server machine to view gp results of my remote client but received the error “RPC service unavailable”. On both machines, I checked firewall and ensured rpc and wmi services were running. I then checked event viewer on the server. I didn’t even need to review events, because my answer was actually in the timestamps of the events. I noticed that the timestamps were wrong and I remembered that my computer battery had drained and the CMOS battery is dead. All I needed to do was restart the time service which resynced the time and solved my initial problem. This can also be done with the command w32tm /resync
¶ Disable “Search the Web”
After the local group policy change failed, I modified the GPO on my server. I used the same policy that I tried with the local group policy. After forcing a GPO update and restarting my computer, there was no change. I logged in to my computer with my admin account and saw that it was successful. I went back to my regular account and still no change.
I reviewed the GPO with gpresult /H gpreport.html/f . This didn't show any GPO applied, so I tried gpresult /scope Computer /H gpreport.html /f .
This required escalation and it showed that the GPO applied. I then thought that maybe it was because I was using a microsoft account instead of an AD account. Similarly, I theorized that my initial registry attempts failed because I am on Windows 11 Pro instead of Home. I think on Pro, it might require a GPO to change certain settings, even if the registry has been modified. This will require more research.
Next, I switched accounts to a non-elevated AD account. Unfortunately, the GPO was not applied. Back in windows server, I saw that security filtering was set to “Authorized Users” so it should have worked. I played around with security settings and nothing seemed to work. Why did the GPO apply for my admin account but not a regular account? I did get it to work, finally, but I need to go back and play around with it some more to see exactly what I did.
Later, it turned out it was a fluke that it worked. It worked intermittently and mostly for a domain admin account. After hours of research and tearing apart the registry, I found out that Microsoft changed how the search feature works. It is now included in the Web Experience Pack, therefore the registry keys are ignored. The registry settings will only work on Windows Server, Enterprise, and Education. As frustrating as all this was, I at least learned a lot about the registry and group policy trying to make it work.
¶ Default Wallpaper
I wanted to figure out how to apply a default wallpaper on domain-joined computers. First, in Group Policy Management, I navigated to User Configuration\Policies\Administrative Templates\Desktop\Desktop and modified “Desktop Wallpaper”. I set the path to the network path of the wallpaper. This did not work because ultimately, I did not have the GPO applied to an OU correctly. I needed to create an OU that I could place my user account in, then I applied the GPO to that OU. This was successful.
The next issue was that the wallpaper would not apply on startup because the computer did not connect to the network yet, therefore it could not access the network location of the wallpaper. To mitigate this issue, I wrote a PowerShell script to copy the wallpaper from the network location to a local folder:
$wallpaper = Get-ChildItem -Path '\\TC-SERVER\MainShare\DefaultWallpaper.jpg'
$newfolder = 'C:\Windows\Web\Wallpaper\TYBAX'
if (-not (Test-Path -Path $newfolder)) {
    New-Item -Path 'C:\Windows\Web\Wallpaper\TYBAX' -ItemType Directory
    Copy-Item -Path '\\TC-SERVER\MainShare\DefaultWallpaper.jpg' -Destination 'C:\Windows\Web\Wallpaper\TYBAX'
} else {
    Copy-Item -Path '\\TC-SERVER\MainShare\DefaultWallpaper.jpg' -Destination 'C:\Windows\Web\Wallpaper\TYBAX'
}
Next, I added a GPO in Computer Configuration\Policies\Administrative Templates\Windows Components\Windows PowerShell and changed “Turn on Script Execution” to ‘Allow local scripts and remote signed scripts’. Then, I created a certificate and used it to sign my script:
# Parameters
$CertificateName - "PowerShell Code Signing"
# Create a Self-Signed SSL certificate
$Certificate = New-SelfSignedCertificate -CertStoreLocation Cert:\CurrentUser\My -Subject "CN=$CertificateName" -KeySpec Signature -Type CodeSigningCert
# Export the Certificate to Documents folder
$CertificatePath = [Environment]::GetFolderPath("MyDocuments")+"\$CertificateName.cer"
Export-Certificate -Cert $Certificate -FilePath $CertificatePath
# Add Certificate to the Trusted Root Store
Get-Item $CertificatePath | Import-Certificate -CertStoreLocation "Cert:\LocalMachine\Root"
Write-Host "Certificate Thumbprint: " $Certificate.Thumbprint
#Set Parameters
$CertificateThumbprint = "8154BF6CC24C0E8EC60E50E066E8E863AA82FBEF"
$ScriptPath = "\\TC-Server\MainShare\MoveWallpaper.ps1"
#Get the Certificate from Cert Store
$CodeSignCert = Get-ChildItem -Path Cert:\CurrentUser\My | Where-Object {$_.Thumbprint -eq $CertificateThumbprint}
#Sign the PS1 file
Set-AuthenticodeSignature -FilePath $ScriptPath -Certificate $CodeSignCert
I then changed the GPO Computer Configuration\Preferences\Control Panel Settings\Scheduled Tasks and added a task to run the script immediately at logon using the system account.
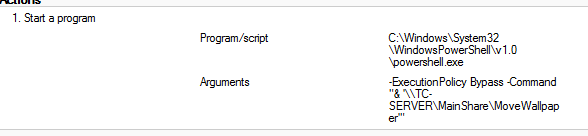
This was successful, but when I changed the wallpaper file, it would not change. I then went back to the scheduled task and changed the common tab option ‘Apply once and do not reapply’ by unchecking it. Now it is successful and changing the wallpaper then forcing gpupdate immediately changes the wallpaper file on the local computer. Obviously, user must log off to change the actual wallpaper.
¶ Computer-OneDrive
- Computer Configuration\Policies\Administrative Templates\Windows Components\OneDrive
- Prevent the usage of OneDrive for file storage
¶ Computer-System
- Computer Configuration\Policies\Administrative Templates\System
- Display highly detailed status messages
¶ User-Filesystem
- User Configuration\Preferences\Control Panel Settings\Folder Options
- Add option to hide hidden files and show extensions
¶ User-Logon
- User Configuration\Policies\Administrative Templates\Windows Components\Windows Logon Options
- Report when logon server was not available during logon
¶ Computer-RemoteDesktop
- Computer Configuration\Policies\Administrative Templates\Windows Components\Remote Desktop Services\Remote Desktop Session Host\Connections
- Allow users to connect remotely by using Remote Desktop Services
- Set rules for remote control of Remote Desktop Services user sessions
- Full Control without user’s permission
¶ Windows LAPS
- Extend the AD Schema
Update-LapsADSchema -Verbose
- Grant permissions for computers to change their own passwords
Set-LapsADComputerSelfPermission -Identity "OU=Workstations,DC=yourdomain,DC=com"
- (optional) Give permission for admins to read LAPS passwords.
Set-LapsADReadPasswordPermission -Identity "OU=Workstations,DC=yourdomain,DC=com" -AllowedPrincipals "yourdomain\HelpDesk-Admins"
- Create new GPO and modify settings under Computer Configuration > Policies > Administrative Templates > System > LAPS.
- Set password backup directory as Active Directory
- Enable Password Encryption
- Set name of admin account
- Set password settings
- Set post-authentication settings
- Configure Authorized password decryptors (If permission given in step 3).
Event logs can be found at Applications and Services Logs > Microsoft > Windows > LAPS > Operational. To view LAPS password, open Active Directory Users and Computers, open the computer and check the LAPS tab.
PowerShell can also be used to obtain the password.
Get-LapsADPassword -Identity "ComputerName" -AsPlainText | Select Password
A password reset can be forced from the GUI or PowerShell. Once the target computer refreshes GPO, it will then change the password and upload it to AD.
Set-LapsADPasswordExpiration -Identity "ComputerName" -Reset
¶ Active Directory
Coming Soon
¶ Entra Connect
¶ Initiate sync
Start-ADSyncSyncCycle -PolicyType Delta
¶ Sync Errors
I kept getting sync errors on the tybax.com connector during export. The errors occurred on 3 different accounts. I first ran the troubleshooting tool in the Azure AD Connect app to re-setup permissions for the AD sync account. This did not work.
Next, I noticed in the Synchronization Service Manager that the error was being caused by the addition of the attribute ms-DS-ConsistencyGuid. I checked ADSIedit to ensure that the AD sync account had the appropriate permissions to write to that attribute. Then, I learned that the error can be caused by the erroneous user accounts being part of a protected admin group such as Domain Admins. By default, these have inheritance disabled, so the AD sync account is not included in the ACLs. Even if you re-enable inheritance, it will be automatically disabled within the hour due to AdminSDholder feature. The solution is to explicitly set the permissions on the user objects.
In ADSIedit, open properties for the user and add the AD sync account to security. Then modify the ACLs to allow Write ms-DS-ConsistencyGuid. Re-run a delta sync in Entra Connect and see the error is resolved.
¶ DNS
When I first started with Windows Server, I had set up DNS and DHCP. (See DHCP for explanation of this). Later, I did an experiment. I set out to change the address pool to 10.0.0.0/24. I started by creating a new IPv4 scope with the applicable options. Below are the scope options I set, although I later learned that this can be set under Server Options instead. Note: At this point I had the Router set as 192.168.0.1.

Once the scope was set up, I activated it and deactivated the old 192.168.0.0 scope. All of my devices almost immediately disconnected and would not obtain a new IP address. I then noticed that there was a blue ‘i' next to IPv4 instead of a green checkmark. I thought that the issue was due to 2 conflicting scopes, so I deleted both scopes and recreated the 10.0.0.0/24 scope from earlier. The issue persisted. I figured out that my scope was actually conflicting with the IP address from the router. In this case, my router was 192.168.0.1. So, I went back to my router settings and changed the IP address to 10.0.0.1 and changed the static IP of my server to 10.0.0.2. After ensuring that I could connect to the internet with this new configuration, I updated the router in the Scope Options to 10.0.0.1. I received a green checkmark and I went to my client machine to release/renew and successfully obtained a new IP address in the 10.0.0.0/24 pool. That’s when I noticed the DNS issue.
Once I configured DHCP, I saw that the DNS records only populated for a couple clients. I also saw that the old domain name (tycoon.local) was still present, although I’m not sure if this was an issue. I went back to DHCP and made sure the scope properties were set according to the below image:
Everything was correct, so I went back to DNS Manager to make sure Dynamic updates were set to “Nonsecure and Secure”.

This was also correct, and then I noticed that the reverse lookup zone was missing. I added this in, and after testing, PTR records generated but A records did not. Eventually, I decided to remove the DNS role and start over. Unfortunately, this did not clear anything as it all came back when I re-added the role. So, I manually deleted the forward and reverse lookup zones and deleted all the files in the \Windows\System32\DNS folder. I went through the DNS wizard to create my zones again and my issue persisted.
I tried using the event logs which helped slightly. I navigated to Applications and Services\Microsoft\Windows\DHCP-Server. The operational events didn’t show anything which actually turned out to be telling because DHCP did not even try to update DNS. The DNS events did not tell me anything either. Later, I checked these logs again, and the DHCP-Server Admin log showed several of the below events:
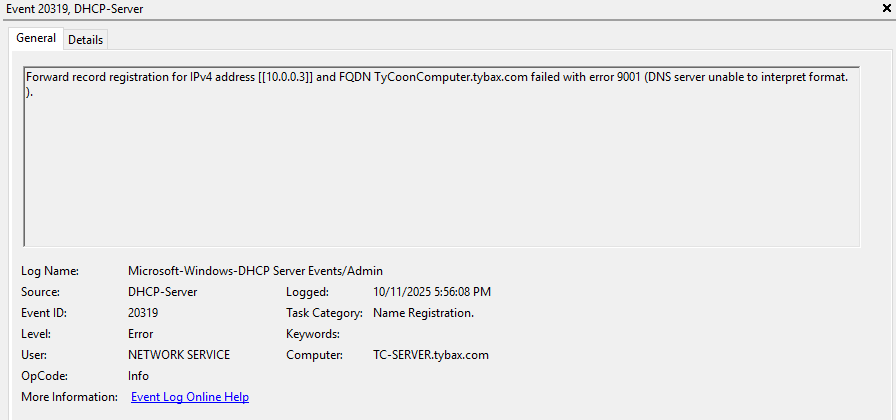
This led me to my forward lookup zone which did not have any A records for my server. I don’t understand the error fully, but I think it is saying that the A record for the server is missing. After adding it though, the error persisted. After various tweaks and a lot of unhelpful research, I followed a hunch that the name of the forward lookup zone actually matters. I had this set as “homelab.tybax.com” and as soon as I added a new zone for “tybax.com”, the server A records immediately generated. I did a release/renew on my client machine and the PTR and A records both generated!
Another minor issue I experience was that the DHCP server was not receiving a hostname for my macbook. I decided to turn off the private Wi-Fi Address option on my Macbook and this resolved the issue! DHCP showed the correct hostname and the associated PTR and A records were created. I tested this with my iPhone and it was also successful. I was hoping there would be a way to force DNS to update based off my DHCP records since they were out of sync, but there’s not really a way to do this. Technically, if all my hosts were windows machines, I could run a script to remotely “ipconfig /registerdns". In my case though, I have many IOT devices so this is not possible. Fortunately, I set the lease expiration to 1 day, so we will see if the records update in 24 hours when the leases renew.
¶ DNS Dynamic Update
In the process of setting up Pi-hole, I noticed an issue with DNS once again not being updated by DHCP. Now, the issue was different than before. When a client communicates with the DHCP server, it will dynamically create/modify DNS records for those clients. However, there are specific conditions that must be met for this to happen.
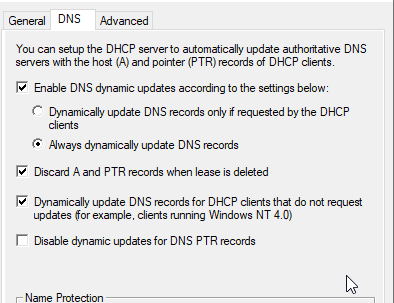
To keep it simple, the DHCP server must be setup with the below settings to ensure that it will update DNS records under any circumstance.
![2025-10-11_18_35_20-scope_[10.0.0.0]_homelab_properties.png](/page-assets/2025-10-11_18_35_20-scope_%5B10.0.0.0%5D_homelab_properties.png)
Additionally, the DHCP server must be authorized, but if clients are successfully receiving leases then it is already authorized. The DHCP server must also have the correct permissions setup to allow for DNS updates. On a regular member server, dedicated credentials must be set, but in the case of a domain controller, the DC computer account is automatically used which should already have the correct permissions.
In my case, the computer account was not configured in DNS. When looking at the security settings for the forward and reverse scopes, there should be an ACL like 'DC01$' (or whatever the domain controller is named). This was missing, so I added it and set it to Full Control. This still did not fix my problem.
I could tell based off the event logs that DHCP wasn't even attempting to update DNS. At least I thought. As it turns out, if there are permission issues, then this update will fail silently. To test, I added a dedicated account in DHCP to be used for DNS Dynamic Update and ensured it had permissions to modify DNS records. This worked right away. Apparently, it is a known Windows issue that may be related to cached credentials/permissions that are incorrect. This most likely happened by migrating my server from one machine to another. The suggested fix is to set dedicated credentials so I was able to keep that solution permanently.
¶ DHCP
One of the first things I wanted to try when I started with Windows Server was building a DHCP server. I began by configuring the DHCP server on my Windows Server. I then wanted to get my client machine to obtain an IP from this server. In looking at my router admin portal, there was not a built-in way to configure a separate DHCP server. There was however an option to disable the DHCP server on the router. I decided to do an experiment and disable it, then went to port forwarding to forward UDP port 67 for DHCP to my Windows Server IP. On my client machine, I did a release/renew and observed it successfully obtained an IP from my Windows Server. I also viewed the DHCP leases on the server and saw the client machine was listed. The flowchart below shows the before and after of my DHCP configuration. Originally, both the server and client would sent DHCP requests to the router. In the new configuration, the client sends the DHCP request to the router on UDP port 67. The router forwards this request to the Windows Server machine which then responds as normal with a broadcast. I tested this successfully on my Mac and even noticed that my IOT devices started obtaining IPs from the Windows Server.
¶ IPv6
I didn’t pay much attention to IPv6 until I started working on wiki.js and RustDesk. Generally, IPv4 is all you need for a local setup, but my situation was a little different. While I was working on setting up wiki.js, I stumbled upon an issue with my Macbook where the IPv6 address was being used which prevented the server from being accessed via it’s domain name. To resolve this, I disabled IPv6 on my Macbook and my windows server. Then, when I started working on RustDesk, I discovered that the containers were only using IPv6 so I was unable to connect no matter what I tried. For this reason, I decided to look into how to set up IPv6 properly.
Due to my router, my configuration options were limited. Here are the steps I took to configure IPv6:
- Set static IPv6 address on Windows Server machine.
- In DNS Manager:
- Ensure Forward Lookup Zone contained an IPv6 Host (AAAA) record for the server.
- Create Reverse Lookup Zone
- Use IPv6 prefix for name which will auto-populate the reverse name.
- All other settings can remain default.
- In DHCP:
- In PowerShell:
Set-NetIPInterface -InterfaceAlias "Wi-Fi" -RouterDiscovery Disabled
- On Router:
- Disable Stateful (DHCPv6)
- Disable IPv4/IPv6 DNS Relay
- Static set IPv6 DNS to Windows Server DNS
- Verify client receives IPv6 address from server:
ipconfig /release6ipconfig /renew6Get-NetIPAddress -AddressFamily IPv6 | Select IPAddress, AddressState, PrefixOrigin, SuffixOrigin- Output should show an IPv6 address with the PrefixOrigin as “DHCP”.
- Verify in Windows Server DHCP that the lease is assigned from the address pool.
Step 4 was required because of Router Advertisement (RA). I found that my adapter kept switching from static IPv6 to obtain automatically which is caused by RA. Even though DHCPv6 was disabled on my router, it was still advertising addresses which get picked up by clients. When I ran the ‘Get-NetIPAddress’ command (shown in step 6a) on my windows server, there were several IPv6 addresses listed, including one that showed a PrefixOrigin of ‘RouterAdvertisement'. The command in step 4 prevents my server from picking up the RA address, therefore it could maintain its static address. As far as my client devices are concerned, the RA addresses shouldn’t be an issue, altough I can disable that behavior if needed. In the future, with a different router, I would want to disable the option for Router Advertisement to prevent these extra addresses from being handed out.
¶ Hybrid Cloud
Coming Soon
¶ SSMS
Coming Soon
¶ Sysinternals
Coming Soon
¶ Custom Domain
Coming Soon
¶ Server Migration
In this section I prepare for the migration of my windows server to Proxmox. My goal is to set up a temporary VM with Windows Server to be used as my DHCP and DNS servers until Proxmox is ready, at which point I can transfer there.
¶ Domain Controller
I first downloaded the Windows Server 2022 ISO and set up a VM. Once booted, I added the new server to my tybax.com domain and promoted it to domain controller by adding to existing domain. In the wizard, I used all default options and ignored warning about DNS delegation.
¶ DHCP Server
¶ Finalize Install
Once the server was successfully promoted to DC, I attempted to finalize the DHCP server install. When trying to authorize the DHCP server, it kept failing, even after ensuring proper credentials and permissions were used. I attempted to fix this by uninstalling the DHCP role and reinstalling, but the result was the same. I then opened the DHCP manager and tried authorizing there and it worked.
¶ Configure DHCP
Next, I configured DHCP by settingg up scopes the same as the old server. I then deactivated the scopes on the old server and verified that clients obtained leases from the new server.
¶ Configure DNS
DNS was already pre-configured when I installed Active Directory Domain Services and it also carried over all DNS records from the old server. The only thing I had to change was adding the forwarding DNS server of 8.8.8.8. I didn't do that at first, so clients were unable to access the internet. I'm not sure why this is the only DNS setting that did not carry over.
¶ IPv6
I was having issues with IPv6 because of how my router hands out leases, so I wasn't able to connect with my VM. I chose to disable it on the server and clients since at this point, I did not need IPv6 on my internal network.
As a side note, I only had IPv6 set up to begin with because I was having issues with setting up Rustdesk which seemed to only want IPv6.
¶ Transfer FSMO
After testing to ensure the new server was functioning as expected, it was time to promote it to primary domain controller. To do this, I needed to transfer FSMO roles. The prerequisite for this are as follows:
- Both domain controllers have to be Global Catalog servers
- DNS must be set up to use the new server
- DHCP must be set up to use the new server
Once the prerequisites are met, the below commands can be executed:
ntdsutil
roles
connections
connect to server New_DC_Name
quit
transfer schema master
transfer naming master
transfer RID master
transfer PDC
transfer infrastructure master
quit
quit
¶ Demote Server
Once all roles are transferred to the new server, the old server can then be demoted. Now the machine is ready to be wiped and install Proxmox.