¶ Introduction
In this section, I describe my process of setting up a wiki. Up until this point, I had been using Confluence for documentation, but I wanted something public-facing so that I could share my journey. Yes, Confluence has options to share, but this requires a paid subscription and just overall isn’t set up the way I was imagining. In my research, I wanted to find options for wiki tools that were public-facing, free, and allowed custom domains. I also wanted a SaaS solution to make management a little easier. Unfortunately, I couldn’t find anything that met all my requirements, so I turned to self-hosted options, specifically Wiki.js as this seemed to be a popular option for other tech enthusiasts.
¶ Docker
Due to limitations with my physical infrastructure, I chose to use Docker to build my wiki solution. At first, I tried to install Docker Desktop on my Windows Server but it actually requires Windows 10 or higher. I couldn’t really use my main computer because it is restarted frequently, especially during testing, so my only other option was my Macbook. I already had Docker installed from a few years ago, but when I tried to update, it froze, so I reinstalled.
¶ Nginx
When I started the nginx container the first time, it was successful. I started by removing the “COPY” command in the DockerFile so that I could see the default configuration. Once I added it back, the new container no longer started. The file I was copying was ‘nginx.conf’, and it contained this:
server (
    listen 80 default_server;
    listen [::]:80 default_server;

    root /usr/share/nginx/html;
    index index.html index.htm;

    server_name _;
    location / {
        try_files $uri $uri/ =404;
    }
)
I tried different variations of modifications, but nothing worked. I then tried to keep the original nginx.conf and instead modify conf.d/default.conf with this same code. That also failed. Finally, I ran docker logs -f <container-id> which showed this error:

Immediately, I saw what I had done wrong. In my nginx.conf file, I transcribed incorrectly and used server() instead of server{}. Once I fixed that, the container started successfully, although at this point I was using this default.conf file for testing:
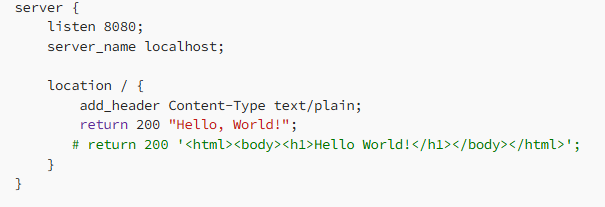
I changed this back to my original default.conf file and it failed. I didn’t understand yet why, but I rewrote it to this and it succeeded:
server {
  listen 80;
  listen [::]:80;
  server_name localhost;

  location / {
    root /usr/share/nginx/html;
    index index.html index.htm;
  }
}
After all this, I learned that another option was to use the official nginx image. After pulling the image with docker pull nginx, I was able to run a container very quickly. The benefit of this is that I will not need to worry about nginx updates later on as this is handled automatically through Docker Hub.
¶ OPTION 1 (Ubuntu image)
- Create new DockerFile in a new directory on local machine.
- Create ‘default.conf’ file in project folder.
- default.conf contents:
# HTTP configuration for a specified host (in this case: localhost)
server {
  listen 80;
  listen [::]:80;
  server_name localhost;

  # Configuration for the '/' route
  location / {
    root /usr/share/nginx/html;
    index index.html index.htm;
  }
}
- DockerFile contents:
# Specify what base image should be used
FROM ubuntu

# Inside the container, update APT then install nginx
RUN apt-get -y update && apt-get -y install nginx

# Copy the default config file from local machine to the container
COPY ./default.conf /etc/nginx/conf.d/default.conf

# Ensures port 80 is exposed
EXPOSE 80/tcp

# Specifies the command to run once container starts
# Starts nginx without self-daemonization
CMD ["/usr/sbin/nginx", "-g", "daemon off;"]
- Bulld image and run docker container
# nginx/server is the name I chose for the image
docker build . -t nginx/server

docker run -dp 80:80 nginx/server
- Go to browser and navigate to localhost to confirm the nginx server is running.
¶ OPTION 2 (nginx image)
docker pull nginxdocker run -dp 80:80 nginx- Go to browser and navigate to localhost to confirm the nginx server is running.
¶ Wiki.js
When I initially created my docker-compose.yml, I set DB_PORT as 5432 because I was following the Wiki.js documentation. When I attempted to navigate to my wiki page in the browser, it wouldn’t connect. Looking at the logs, I saw that the database connection was failing. I realized that the 5432 port is for Postgres, so I changed it to 3306 for MySql. This was successful.
Now that I was ready to expose my wiki to the public, I ran in to a lot of issues. I began by modifying my docker-compose.yml to include nginx and certbot. When I ran docker compose up -d nginx would not start. The logs showed that I was missing volumes. Actually, that ended up being the source of many problems. I needed to create folders in my local project folder that would be used to bind to the container volumes. I was also mising the conf file so that nginx would be configured with the right server info. I had issues with certbot authenticating, even thought the A record was created and propagated with my domain registrar. I ended up needing to remove the SSL portion of my conf file, then docker compose up -d nginx certbot, then docker compose exec certbot certbot certonly (from entrypoint in the docker-compose.yml). Basically, I needed to generate the certs, then add SSL back in and restart everything. That’s when all my containers ran. Although, certbot-init stopped and the error was because a cert was already issued so I will need to address that. Note: I later discovered that certbot-init is only for the initial cert creation so I can comment that out.
One issue I had when trying curl ifconfig.me on the Macbook, was that it was showing the IPv6 address. I didn’t want to deal with that headache, so I disabled IPv6 and got the correct IPv4 WAN. Once I got my certs working and containers started I eventually tried searching my wiki via IP address and this worked. I tried the regular domain on my phone and it worked, so I knew it was an internal DNS issue. On my pc, I tried nslookup wiki.tybax.com and this failed. It was showing an IPv6 address as the server. I ended up just disabling IPv6 on my pc so that it would use the IPV4 of my server instead. This fixed everything.
Something I tried was getting a static WAN IP. I thought I could avoid paying for it since my router has an option to put a static IP. Unfortunately, this broke everything. I eventually got IPv6 functioning, but IPv4 would not connect. I ended up reversing the process and luckily, my old WAN IP came back so I didn’t have to change my domain A record. The static IP issue will need to be revisited later.
In the process of messing with the WAN, something happened that prevented my apple devices from connecting to the wikijs server once I started the container. I could reach it from my client pc and windows server, and also from my phone on cellular. But my phone on wifi and Macbook would not connect. Everything was correct in my router config and DNS setup. What I discovered, was that if 2 DNS server addresses are set up, apple devices query both and return results for whatever answers first.
On my Macbook, I ran the command curl -v https://wiki.tybax.com. This showed that it was trying my public IP instead of my windows server IP. To fix this, I went to my DHCP configuration on my server and removed 8.8.8.8 in the scope options for DNS servers. I realized this was unnecessary anyway because in my DNS configuration, I have 8.8.8.8 set up as a forwarder, so this didn’t need to be used by client machines directly. Once I changed that, I was able to connect without issue.
To secure my project, I made a few changes. To start, I bound port 3000 to localhost so that it was not exposed externally. I then added additional configuration options to wiki.tybax.com.conf so make nginx more secure. For my environment variable, I followed Docker’s documentation to use Secrets in a docker compose file. The below codeblock is from the Docker documentation. I included these concepts in my file and it worked! One issue I had was that I could no longer access my wiki because I was getting a 502 error with nginx. When I ran docker logs wikijs I found that the database wasn’t connecting due to invalid credentials. I forgot I had changed them, so I just removed the server_db-data volume and re-upped the containers.
services:
   db:
     image: mysql:latest
     volumes:
       - db_data:/var/lib/mysql
     environment:
       MYSQL_ROOT_PASSWORD_FILE: /run/secrets/db_root_password
       MYSQL_DATABASE: wordpress
       MYSQL_USER: wordpress
       MYSQL_PASSWORD_FILE: /run/secrets/db_password
     secrets:
       - db_root_password
       - db_password

   wordpress:
     depends_on:
       - db
     image: wordpress:latest
     ports:
       - "8000:80"
     environment:
       WORDPRESS_DB_HOST: db:3306
       WORDPRESS_DB_USER: wordpress
       WORDPRESS_DB_PASSWORD_FILE: /run/secrets/db_password
     secrets:
       - db_password


secrets:
   db_password:
     file: db_password.txt
   db_root_password:
     file: db_root_password.txt

volumes:
    db_data:
¶ Authentication
My next step was adding different authentication instead of just local. To do this, I used the Azure AD module and set up the app registration in my Azure tenant. An issue I had with this was that it would not prompt for selecting an account if there was already an active session in the browser. I tried to get around this by using generic Oauth2, but this prevented login because the email was missing. The Oauth module in Wiki.js pulls the email from the Profile, but an email is only added if the user has a mail account. For this reason, I switched back to Azure AD Authentication.
As part of my troubleshooting, I went in to the container to view the module files:
docker exec -it wikijs /bin/sh
cd server/modules/authentication/azure
cat authentication.js
I also made temporary changes to this, but it isn't a long-term solution since you wouldn't be able to remove and re-up containers without some kind of script to modify files inside the container. To make changes to the file I used vi authentication.js. To be able to edit, you have to press i, then when you are done editing, press ESC then enter :wq to exit.
Another problem I had was that logging out of my test account, then logging back in would just give an error about invalid credentials. This is due to the session cookies not being properly cleared, but I could not find a way to do this. For now, the workaround is to use incognito mode.
¶ Map Groups
A feature that I liked with Wiki.js was the map groups function. When enabled, it allowed the groups from Azure AD to be used for Wiki.js. To do this, I created groups in Entra ID then went to App Registrations > Token Configuration to add Group Claims. Then, in Wiki.js, I added groups that were named the same as my Entra groups. At first, this didn't work because Wiki.js was not receiving Group Names, only Group IDs. Since Wiki.js didn't have an option to use Microsoft Graph, I just used the Group IDs when creating groups in my wiki. This was successful and I was able to change the user's Entra group, then login again, and saw that the user was added to the new group and removed from the old group.
¶ Git Storage
In this section, I set up backup storage using Github. The instructions were a little outdated, so this is what I did:
- On my Macbook (Docker host), run this command:
ssh-keygen -t rsa -b 4096
- When prompted, enter a location to store the key:
# This creates a file called 'github in the data directory
./data/github
- In the data folder, there should now be 2 files:
github # Private Key
github.pub # Public Key
- Modify docker-compose.yml to bind the private key to a file inside the container and set it to Read Only (ro). Add this to the wiki service:
### Existing Code ###
volumes:
 - ./data/github:/etc/wiki/github.pem:ro
- After re-upping the containers, you can check that this was done correctly:
docker exec -it wikijs /bin/sh
cat /etc/wiki/github.pem
- On Github, navigate to Settings > SSH and GPG Keys
- Click New SSH Key and paste in the public key that was previously generated.
Key Type should default to Authentication Key
- If not already done, create a Github repo for the wiki, then copy the SSH URL.
- In Wiki.js, navigate to Administration > Storage and check the box next to Git.
- Configure settings:
a. Authentication Type = SSH
b. Repository URL = SSH URL copied in step 8
c. Branch = main
d. SSH Private Key Mode = path
e. SSH Private Key Path = /etc/wiki/github.pem
f. SSH Private Key Contents = blank
g. Verify SSL Certificate = ON
h. Username = blank
i. Password = blank
j. Default Author Email = Your github email
k. Default Author Name = Your name
l. Local Repository Path = ./etc/repo
m. Always Locale Namespace = OFF
n. Git Binary Path = blank
o. Sync Direction = Bi-directional
p. Sync Schedule = 5 minutes - At the bottom, press Run under Add Untracked Changes. Then press Run next to Force sync. This will create the first push to the github repo.
The only issue I had was with the email. Specifically, I have my email set to private on Github and the box next to Block command line pushes that expose my email was checked. This was actually preventing pushes, even when I used the public email address. Once I unchecked that box,I was able to push successfully and all my data showed up on Github.
¶ PlantUML
I wanted to try out PlantUML but when I tried using the syntax from the PlantUML documentation, it would not return the UML diagram. I tried navigating to the PlantUML service from Requarks but I was blocked so I decided to try and set up my own PlantUML server by creating a docker container with the below command:
docker run --name plantuml --network nginx_internal -d -p 4000:8080 plantuml/plantuml-server:jetty
I used the --network flag because I needed my wikijs container to be able to access this. I also set the host port to 4000 since 8080 is already in use.
Then, in the Wiki.js Admin settings for Rendering, I modified the PlantUML URL to http://10.0.0.11:4000. Unfortunately, I still didn't have a UML diagram rendered.
My next step was to use the browser developer tools. That is when I saw the Content Security Policy (CSP) was blocking that resource. I modified ./nginx/conf.d/wiki.tybax.com in my docker project folder so that the CSP showed:
add_header Content-Security-Policy "default-src 'self'; script-src 'self' 'unsafe-inline' 'unsafe-eval'; img-src 'self' http://10.0.0.11:4000; style-src 'self' 'unsafe-inline';" always;
I had to do a full
docker compose downto get nginx to use the new config file
This change still did not work, so I looked in the developer tools again and saw the Mixed Content Policy was blocking the resource. This means that it could not deliver HTTP along with HTTPS, especially because I was using a private IP address in the URL.
To solve this issue, I again modified wiki.tybax.com and added this block:
location /plantuml/ {
        proxy_pass http://10.0.0.11:4000/;
        proxy_set_header Host $host;
        proxy_set_header X-Real-IP $remote_addr;
        proxy_set_header X-Forwarded-For $proxy_add_x_forwarded_for;
        proxy_set_header X-Forwarded-Proto $scheme;
    }
Then I modified the CSP again to:
add_header Content-Security-Policy "default-src 'self'; script-src 'self' 'unsafe-inline' 'unsafe-eval'; img-src 'self' https://wiki.tybax.com https://plantuml.requarks.io; style-src 'self' 'unsafe-inline';" always;
Even though I am using a self-hosted PlantUML server, Wiki.js still uses the default https://plantuml.requarks.io for the Markdown preview pane. For this reason, it is necessary to add to the CSP, otherwise the UML diagram will only be rendered when the editor is closed.
After restarting the docker containers, I went back to my Wiki.js Admin settings and changed the PlantUML URL to https://wiki.tybax.com/plantuml and I was able to successfully render UML diagrams.